Showing posts with label crafts. Show all posts

Sunday, 6 May 2018

Building Rex's Moving Castle

In honour of Star Wars Day this year I'll be introducing another toy making project I've been working on for R that I've dubbed Rex's Moving Castle.

R absolutely loves the two-part Rebels episode The Lost Commanders and Relics of the Old Republic since she first saw it two years ago. She's watched that over and over again so many times. In this episode (context for those who've not seen it), the Rebels meet Rex and some other veterans of the Clone Wars who've retired to an out-of-the-way planet. These people live on an old AT-TE walker, heavily modified from a war machine into a home, in which they travel around the planet, stomping loudly and emitting smoke – highly reminiscent of the titular Howl's Moving Castle, a movie R also loves.


Modified AT-TE vs Howl's moving castle

L and I got an idea. I'd just finished up with building Howl's Moving Castle and the creative juices were running strong. So, unbeknownst to R, we bought a old AT-TE toy off eBay and started to modify it. I kept it covered under a tarp in the office (off limits to R) for several months while I planned and built it up – very slowly.


My home office desk

In terms of projects it was quite a bit of a challenge. I've gone through that episode frame by frame, eyeballing the layout and figuring out how to not only scale it down by 1:18 for the figures, but then modify it further to fit the actual size of the toy Walker (like most toy vehicles, it's not to scale). Fortunately the Star Wars web site has some good diagrams of it from which I was able to fill in the details not clear in the episodes.


Detail of concept art of the modified AT-TE from the Star Wars web site.

The process for building this is both fun and challenging.

  1. Take pictures of the toy with a ruler for scale. The hardest part here is taking the picture far away enough to minimise parallax but still be able to focus clearly on the ruler.
  2. Import into Illustrator, scaled to the correct size, then start drawing the 2d plans.
  3. Print out the plans, page by page, and use them to cut cardboard mock ups. Cutting along the lines of a print-out is much easier than measuring and cutting by hand.
  4. Tape the parts to the Walker to see how it fits. Often I'll try putting a figure or two on the part to see if it actually looks right and is properly playable.
  5. Repeat many times until the size is right.
  6. Do a final full colour print out. Glue it to the foam board and cut it with a sharp razor into that shape.
  7. Hot glue that the the walker. Make sure to use a level so that figures can stand on the flat platforms without toppline.
  8. Relax for a few days/weeks and get started on the next part.

I started with the easier parts. Building on to the Walker with platforms at the front and back. It took longer than I expected. We'd originally planned to give it to R by the end of the 2017, but it wasn't ready. So, instead, we surprised her with the work in progress with the promise of letting her help with putting it together.

In the months since then I've mainly essentially been learning about mini-DIY. I went through a dry period around the start of this year where I got nothing done. I'd finished the back room in Feb after working on it for 6 months. I sort of gave up thinking that everything left was going to be hard. Or at least notably harder.

A coworker introduced me to Fusion 360 – a bit of CAD software meant for hobbyists and the like. It wasn't too hard to export the Illustrator diagrams, extrude them and position the parts the way they'd look in reality. That was a breakthrough – being able to see what things look like before I even cut them out. It helped tremendously with the top back platform, since it showed me I'd got some sizes way off (the downside of mocking up in 2mm thick cardboard when the actual material would be 5mm). Now that the stuff I'm working on is particularly hard the CAD has been coming in useful.


Putting together with CAD software is slightly faster than cutting and gluing, and much less likely to cause cuts and burns

The latest phase I've done is having to drill into the toy to attach parts. It's a bit scary since if I make a mistake it'll be very hard to recover. Now that I've done it I do wish I'd done it for the front side walkways because it would have supported things much better than just hot glue.

I'm done with the drilling now, as far as I can see. I like to think I'm on the final stretch but I've still many complex things (like winches and pipes) to do and many little things (like lanterns and railings). Regardless I'm trying to not count the things left so I still retain my optimism for the project.

I've set up an Instagram page, My Many Creations for this, the spaceport and other things I've been doing.


Friday, 13 October 2017

Spaceport Part 4: The lower level

At this point the spaceport was split in two parts – the landing platform, and the bookshelf part.

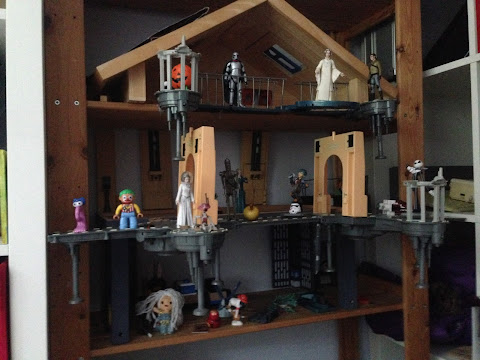
The landing had the roof for the Falcon to land on, and an internal hanger for Moya – R's Fischer Price little people airplane. The bookshelf part had 2 levels for fun play, a top floor, too tall for R to even reach, and a large bottom section which was no fun and just held random toys she didn't like to play with.

Needless to say, it bothered me that the space was not put to good use. I didn't really have a vision for how it could be used, but I did have plenty of spare parts left over from the Theed playset which were just adding to the clutter. So I decided to put them to use and make and half-floor in the lower level.

This was more difficult in a way since it required 1) actual construction that was more than apply hot glue to a to attach it to b and 2) a plan. The best I could do planwise was to use as many of the left over parts as I could.


In progress waiting for the glue to dry

The floor left over from the playset was awful. Which was why I'd not used it up until then. It was full of cut out lines where you could theoretically move figures around and make them do actions. I filled those in with hot glue and painted over the top so it didn't look too bad. You can see in the picture that they're visible, but I can live with it.

The floor is supposed to attach to two partial walls. I glued those in place, and glued shut the moving parts so it would be stable. Unfortunately there was the huge gap between them, which, without something in there, made the whole thing too wobbly. So I put some thick card stock between then, and covered half of it with a standard imperial wall decal, and fixed below that a lenticular postcard of the solar system R had lying around. It bothered me for quite a while that I was using a real space thing in Star Wars themed décor. But I told that part of my brain to shut up over and again until I could live with it.


Ready for play

I added on one of the random archways to the end to make it look more like a room, and connected the side of that to the other wall with pipes made from bendy straws. Hot glue does not stick to bendy straws very well at all. So these kept breaking off. I still need to replace a few of them.

With the platform ready, I had to attach it in place. I couldn't just glue it to the shelf above. It would fall off as soon as R played with it with any force. I had to support it somehow. I settled on some thick wire we had left over from handing things in R's room. Attaching that to the shelf above gave it stability and has held to this day.

Shortly after that, I finally finished decorating the stairs on the landing platform. The big problem I'd been facing was making them look thematically like the Bespin steps – the lights on the rise part with the circle - rectangle - circle pattern. I had the reflective tape to make it, but cutting a round shape was beyond my skills.

I bought a hole punch, which gave the ability to make repeatable perfectly sized round dots. I gave up on my attempts to make the shape between the dots rounded, but I think it came they came out pretty well regardless, as you can see in the photo.


Flash photo to emphasise the reflective tape

Sunday, 2 July 2017

Spaceport Part 3: Painting

I had in my head an image of the Falcon in the Death Star from the first movie. That, to me, is what the landing platform for the girl's spaceport should look like. Landing lights, arrows on the floor, a big glowing entrance – that sort of thing.

This was new territory for me. First I had to overcome my reluctance to make permanent changes. So far I'd only unscrewed things. By paining there was no going back to the dollhouse the way it was before. So I had to be sure I was going to get it right or I'd risk ruining this dollhouse for nothing.

I started with the easy part: Stickers. I bought some shiny stick-on sparkles, and some highly reflective white tape. An easy first step, but I couldn't add those until I was finished.

Then was the next easy step: colouring stuff black. Everyone knows how to use a sharpie. So I drew some black highlights around the edges. I had R help me put the "landing lights" (shiny sparkle stickers) on the edges that I coloured black. Her temperament wasn't well suited for measuring and putting evenly-spaced stickers, but she persevered. And when we finished, she covered pretty much everything she owned with the remaining shiny dot stickers. Lesson learnt: put supplies away when done.

The black sharpie was easy to use, but it wasn't enough. I needed something grey so everything wasn't too dark. I tried buying grey sharpies and other pens. Nothing worked – they weren't opaque enough and the wood pattern showed through. I had to try something new. I got some dark grey paint and mixed it with white until I got the shade I was looking for (You've unlocked: mixing paint). Together it made a nice landing platform for the Falcon.


The top landing platform

To complete my vision, I had to paint the bottom as well. It was mostly a case of painting the floor black, then adding reflective tape to the floor and around the entrance as decorations. I printed out some decals from an extremely helpful website and glued them to some supports and the uncovered floor area.


Painted with decals

The Theed door (above) fit perfectly, so I put that in as an entrance from the uncovered area. I also had some left over paint, so I painted parts of the stairs grey (the parts R hadn't already painted with watercolours one industrious rainy day) and added a floor decal to the landing.


With figures and stairs

To finish off the effect I painted the other floor I took from the original dollhouse

and added more decals to the supports to make it look more Imperial. Note the additional observation platform on the top floor (Mon Mothma’s standing on it). The original attachments met with a bit of an accident, so I put it back together with more pieces and a little less wonky.


You can also see, slightly, a balcony I made from the original styrofoam we'd planned to make a little Millennium Falcon out of. I'd just painted it and added laminated decals for the floor (I’m finally getting good use out of the laminator I bought on a whim a (it was on sale) a few years ago). To top it off, I made railings out of toothpicks. The railings were, ultimately, too fragile, and ended up breaking a few months ago.

That was pretty much it for several months. It was a lot of work to get there, and I couldn't figure out how to attach the rest of the parts I'd gotten. So they sat there through the summer until late fall, where Part 4 begins.

Thursday, 18 May 2017

Spaceport Part 2: The observation tower

We've had a shelving unit for some years. It used to live in the kitchen to store pots and pans, but since we moved to the current place, it's lived in the girl's room. We made a partial attempt to use it as a bookcase, but it ended up just being random storage – mostly for toys.

Once the dollhouse was turned into a spaceport, and all the extra parts moved onto the bookcase, I felt the two could be combined into a single larger spaceport. It needed some sprucing up, so I found some cheap used Star Wars playsets in dubious condition on ebay. Most of the parts were from a Theed playset – it didn't appear to be very fun looking on its own, but there were lots of walkways and platforms. I glued these to the shelves so they hung above the spaceport, making the bookcase into a sort of observation tower.

As it turned out, she wasn't tall enough to play with anything on the top level, so that ended up mainly to just be used for storage and posing figures she didn't use much. For the most part it was just for decoration, or as a thing guests could accidentally break, or just something to stop us from easily getting into her nearby drawers.

It was fairly bland up to that point, but I had an image in my head for the making the landing platform more fun. That would require actual decorating. More on that in Part 3.

Thursday, 27 April 2017

Spaceport: Part 1

When R decided she really liked Star Wars, I gave her some of my old Star Wars figures from my childhood. And after time, she was starting to amass a bit of a collection of these and other small toys. And as toy collections grow, so does the mess of a child's room.

R also has a big dollhouse. A nice big wooden, handcrafted (as far as I can tell), dollhouse. It was a hand-me-down gift from a friend whose daughter no longer used it. R did like it and use it for a while. But eventually she stopped playing with it. It was too small for her stuffed toys and too big for her smaller figures. So it became a place for dirty clothes and toys she didn't use. It moved from room to room, taking up precious space in our London flat. So one day I asked her about it.

You don't really use your dollhouse. Do you not really like it?

(sheepishly) No.

How about we turn it into a space port?

YES!

That's where the Spaceport project began. Today it's gone well beyond what I had intended. The original plan was:

  1. remove the top two floors of the dollhouse
  2. turn the bottom level into a spaceport for her Fisher Price airplane (named Moya)to park inside
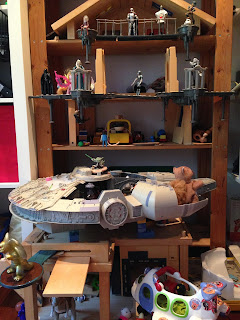
I took all the remaining parts of the dollhouse and put them in the bookshelf we used to store toys and stuff. Which had the nice effect of splitting the large shelves in two. Already it added storage and saved space.

I had some ideas of how to decorate the spaceport to make it more exciting, but I was hesitant to start. Partly because it meant making permanent changes to the dollhouse, and partly because much of what I had in my head was, if I was honest, beyond my skills. Turn out, when I did try enhancing it, pretty much everything I tried failed at first. Then I'd have to skill up to make it work. Repeat over and over for a year and you can imagine it's gotten quite elaborate by now. But I am getting ahead of myself…

The Falcon

She liked putting all her star wars toys together on a broken piece of styrofoam and saying it was either spaceship or a sofa. Usually the former. L and I talked about colouring and shaping the styrofoam to look a bit like the Millennium Falcon, but that never really materialised.

Time passed, as it does, and one day I was following links on the web, as you do. I ended up on the Star Wars site, on a page talking about the original Millennium Falcon toy. This bit struck me:

It measured about 53 centimeters long, and compared to a figure of Han Solo (about 10 centimeters tall) was almost four times too small. If Kenner had built the Falcon on a 1:1 scale with the figures, it would have been about 190 centimeters long. Hasbro almost achieved this with their “big” edition of the Falcon in 2008 which measured about 82 centimeters.

“Big” edition??? I'd never heard of that. A quick search on the web found a trove of reviews and pictures. This Millennium Falcon would be just the sort of dollhouse that she'd appreciate. But given that it was released in 2008 and there was no way it'd still be in shops, I dismissed it as just a fantasy. That was until L introduced me to the world of Ebay.

It took a couple of months of looking, but I eventually found one at a reasonable price (they usually go for at least £100 in reasonable condition, so I was lucky). When it showed up, it was, for starters, huge. L took some photos of me playing with it.

Are you sure it's for her and not for you?

Well… did I ever tell you about the time when I was a kid and I asked for a toy Falcon if I could keep my room clean for a year?

Did you manage it?

Are you kidding? I didn't last a week.

R loved the Falcon. It became the home for her Star Wars and other toys and lived on top of the spaceport. Where it lives to this day. But the spaceport itself has changed quite a bit. but that's a story for part 2.